Project Clones: The comics. Part 2.

Making of first page; 2nd album of Clones

Click me to view the entire process!

“Heya folks!” Goodmorning – or afternoon – depending on where you’re currently reading this from. I’m just going to post a small update here on the progress of Clones whilst the first album is over at the press store. As you might remember, I did a few of these step-by-step progress shots in the past, right? Well, for this months treat to you guys, I decided to post another one of the first page of my second comic of Clones.

As usual, I’m posting ‘m without the text, for a twofold reason: partially because the art alone deserves an equal place in the spotlights and secondly, because I’m still not sure what I’m going to do with the whole “should-I-post-this-online-or-not” issue. I guess a lot is riding on finding a decent publisher. Something I really should work harder on. For now tough, I invite you to enjoy these seven slides made from blood, sweat and .. well.. no tears (yet).

A lot of effort went in it though, and I’m still not sure over the final colors (and might change ‘m during the development of the other pages) but hey, I have to move on, otherwise I will get nothing done! For further development on this project, you can always find more wip-shots over at my Twitter page or on Somewhere.

For now, I’m of to bed though. Sleepwell!

Comic 2 Clones Page 1

How To Make A Map in 20 Steps

For a while now, I’ve been perusing the net on how to make a good looking map.
There are some sites out there that actually offer valuable tips, but it’s still nothing that I really wanted/needed. So that’s why I decided to do it myself. Partially for the reason cause I really really wanted to, but also because my Clones need a world at some point. So yay for bonusreasons! I actually got the idea from my DM on one of the weekly DnD session, since she’s done a bang up job in creating her own map for us. It got me thinking on what I wanted in my world. And that’s what you’ll need first.

Wip_Map_011. Make a solid list of all the places you’d like to see in your world. This can be anything and everything your heart desires most. You like giant oceans infested with Bermuda Triangles or ancient monsters asleep in the deep? Go for it. You always wanted to have you characters wandering the high plains of some fantasy realm? Or even better, deep below the Highest Mountains, where ancient caverns hold the most foul creatures yet to be discovered.. The possibilities are endless. For the sake of this tutorial, I do have to mention that I did all the drawing in photoshop. You’ll need a certain knowledge of layers, brushes, and being able to work with textures and the like. If you’re fine with all this, go on then, what are you waiting for?

Wip_Map_032. I went with a partially ice-covered and flooded world. Some mountains here ‘n there and a few fields of grass, and a couple of green forests/jungles to finish it of. So that’s a lotta green, white and blue really. Remember, this is all to scale. So I added a lot of lakes in between, as a direct result from the flood. For a brief moment I considered adding volcano’s as well, but thought this would be a bit too much of the good stuff. I’ll save that for underground maybe. We’ll see. This brings me to the next bit: how you want it to look on the surface, and more precisely, it’s borders.

Wip_Map_053. Get your most squiggly hand-shaking drawing style out and start making lines this way. I bet you it’ll do its part in the end. You won’t thank me for it when it’s coloring time though.

4. Which is now actually. You like swearing like a sailor? Well, you got a decent reason now. After a while, you’ll get the feeling you want to smash something with a sledgehammer. That means you’re doing really good on the details. Keep at it!

5. By now, you should have some awesome pieces of land, and be able to seperate them as individual continents and/or islands. Time to start working on those deep and treacherous oceans, right?

Wip_Map_076. First of all, decide on how deep you want them to be, those treacherous depths of water. You want a huge sleeper dragon or just some casual sharks in it? The deeper it goes, the darker the tone of your blue will be. Every map you’ll take a look at (you did do some research, right?), will show you the same result on this matter.

7. After lining them out, you start with some moooore coloring. Oh dear, when will it end?

Wip_Map_088. Okay, now for the fun part. Start throwing in some texture, these will represent your rifts and fissures and whatnot. Same for the landmasses, give those mountains of yours a go. It’ll liven up the place a bit (this is where I pretend I’m a god, by lifting up my hand to the sky and raising whole mountains out of the ground).

9. Now we start with the nitpicking. Carefully make equally great squares and form an entire grid for your map. It’s all about location, location, location.

Wip_Map_12
10. I got tired of it. Added some more snow. Wanted to give one of my new brushes a try.
11. Hey, you know what a map needs? A compass. Shinyyy.
12. Ugh, more nitpicking? Fine, add some grades, coördinates, shiny numbers and stuff like that. Here’s where your reference material kicks in. You’ll love it. And don’t forget to add an Equator and the Tropic of Capricorn and Cancer and all that. You know, details.

Wip_Map_1313. EEeeey!!! The fun finally starts! Let’s make it old-timey! Cause who wants a shiny new map? That’s boring man. Let’s scribble a bit on it, set it on fire, make burnmarks, spill coffee on it, and draw all sorts of fun stuff on it. Go bananas! For now, copy your map on a different layer and give it that brown hue, it’ll come over the original colors in the end.
14. Make it even more older, erase some parts.

15. Done playing? No way! This is where you combine the two. Erase a bit where still needed and see if it fits.
16. Think you’re done? Nu-uh. Keep doing that shiny stuff. It took me several goes, after all.
17. Now, time for textures. More fun stuff. I got a small offline databank -coughyeahright!cough- of textures, ready to be used at the flick of a wrist. For this one, I chose something with a lotta folds.


18. Next up, we add splatters of ink, or dirt, or whatever that has your fancy really.

19. Since I really didn’t like how the folds weren’t accentuated, I decided to brush ‘m up a bit at this point as well.


World Map Morraban
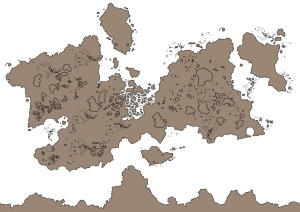
20.
Alright, you’re almost done. Just add all those places of interest you had in that big list of yours, all the mountainpasses, the swamps, minefields, secret lairs in the volcano, oceans of sharks around your base.. I’m drifting again. Hum. Just look at the image I provided as my end result, you get the idea, right?

Right, so there you have it. 20 Simple Steps. And you got yourself a kickass map for your imaginary world to go play with! Thanks for reading people, I hope you had fun with it.

Project Clones: The comics. Part 1.

banner2wip_02
For a while now I’ve been working on a few sideprojects. When I say “for a while” I actually mean, for a very, very, very, very, really big, (holy moly I can’t remember when I started), verrrrrry long time. One of these sideprojects are my little Clones.

I’m sure you’ve noticed them trudging around here ‘n there. Though it’s only been recently that I decided to mold them into comic form. So that means -if you know me a bit- I started building up a huge reserve of pages lately. Work on it goes slow, as usual, but it’s very rewarding. Since I normally share my wip (Work In Progress) shots on twitter or the platform of Somewhere,
I thought it’d be a nice change of pace to throw it on here.wip_B08_Small

What I’m about to show you here, is a small breakdown of what normally takes about two days of work. We start at the sketching phase, go over the linework, move on to the shadows, with the flat colors next and the final painting as last. Though normally I tend to skip a few things for myself here ‘n there you know. For example, for the purpose of this small peek behind the screen, I seperated all the phases, but usually I tend to do my shadows alongside with my flat colors, and even add some light here ‘n there as well. Maybe even throw in a few effects even. It’s odd, that I’d have the same work method as a normal painter, since I almost never liked painting with a real brush in the past. You could say this is my compensation for it.

So this is it. Now you have a small insight in the making of the art for comic books. I’m not sure I’m doing it right though, since I still feel like I’m treating my pages way too much like my illustrations and therefore am losing a lot of time over simple messing around with the final details. Though I do got most of the process down to full automatisation and even got the script laid out for several more pages, so that shouldn’t be a problem (for now).

Don’t forget to check my tweets regularly if you want to stay up to date!

The Grand Army of the Republic Wants You

Here’s a question to all you budding artists who are reading this: “Haven’t you ever wondered how your art will look like in about five or so years from now?”

Well, a couple of years ago, when I was trying out various styles, I had that same question. Nowadays, nothing has really changed, I’ll have you know. Though I can say I made some vast improvements on various levels. Anatomy being one of them. Or.. well, at least I hope I have. That’s more for the experts to decide, really. Anyway, a couple of days ago I decided to do something I normally never do; to redo a painting from a couple of years ago. I chose to do this particular piece, because (in contrast to the happiness level I had reached about it, back then) I never “really” was fully happy with it. Something felt “off”. Either it was her mouth, her build or the way she was standing. Or maybe it was the way I had painted her skin .. something (or all of it combined) felt very wrong.

So after various amounts of tweaking and eventually leaving it to move on to other projects, I decided to rebuild this one from the ground up. I only kept the pose and outfit and gave her a completely different style, look and attitude. She now looks more like what I had in mind in the first place. My inner demons were pleased when I finally finished the new, improved version. And only then do I truly know that it’s “done”.

Because I love to help you guide through the entire process, I created a small work-in-progress version as well, showing you how exactly I came by to this final result. Let’s go through the entire process with the usual four steps, which you might remember from last time, should you have read it already.

Just as last time, I’ll begin with a simple line trace for Step #01, the hard (please-let-this-be-over-quickly) work of every drawing. If you (or your clone) made it through this part in one piece, we can step over to the next part.

Step #02 is still gruntwork, since we’re adding the basic colors and shadows at this stage, though I’d like to adress you that you pay strong attention to the light here, since you don’t want your subject to look unrealistic. I didn’t want to emphasize the light and shadow this time, so I kept it light and fluffy for once.

Step #03 is the where the jolly part kicks in and where I take it over from my clone; the detailed coloring of the subject. This is where my reference material kicks in as usual, especially for those “detailed” specifics in this instance -hum- ..

To end the process, we have Step #04, where the icing of the cake happens. The magic. The good stuff. My all-time favorite, the small details, the textures, every bruise, scratch and dirt spot has to be taken care of in this process. Everything to make your painting just that bit more shiny. Usually followed up by some/a few/a lot of corrections since I’m going very micro in this stadium. This is normally the point where you best mirror your paint or take a step back, just to see if and where you went wrong. Though, I’m no expert in this, since I *still* need to remind myself of this a bit. If you did something wrong big-time, then it’s usually back to Step #03, get past start and earn yourself a quick 200$ on the way. Or does that only count for Monopoly?

A comparison between the old and new version of “Join The GAR”

And oh yeah, here’s a comparison of the old versus the new result. What do you think? A lot better, right? I hope you guys found this as fun and informative as I had making this. Now, onto the next one, shall we?.

Cheers,
-me

‘The Warrior’ from Sketch to Paint

Presentation tutorial #01

Hello there and welcome back!

Since my last post, my team of robot clones and I have been working very hard (mostly them) to create a small tutorial of an old painting I did a while ago. We’re now a week later, and I remain in that post look-what-I-just-made haze, where as I feel I’ve been more productive than I actually have. That’s largely thanks to everyone who’s been checking out my last post on A Peek Behind The Curtain. The feedback on it has been great, so that’s why I plan on keeping it going for a bit and see how it all pans out.

So without further ado, I put my team of robotic clones to the test and made ‘m work for their daily dose of batteries. That’s why I’m proud to present to you a small video-tutorial of how I usually ink my paintings. This one in particular is completely done in black and white, this to more emphasize the line work of the painting.

So sit back, open up your favourite graphical program, and get going along with me as we create another painting from start to finish.

The Warrior from start to finish

Cheers,
Me.

A Peek Behind The Curtain

So summer has passed and again there’s this gap already from a couple of weeks, in between this and last post. Honestly, I *am* trying to keep consistent by posting at least once every month, but unfortunately work and just life in general catches up with you *fast*. It’s like you blink and all the sudden there’s another month gone by? Where the heck did that summer go?

Now, I am not here to bore you with the past, but with stuff that should give you a small peek behind the smokescreen of this artist’s way of working. As I’ve been hearing left and right, people actually seem to dig the work in progress of an artist as well. I’ve discussed this previously (a couple of posts ago) as well, yet didn’t explore it further and just went on my way. Well, I’m here to announce I’m going to try to change all that. Big words, I know, since I’m not that good with promises and all that jazz.. But I’ll try to stick to it from now on. Promise. I’m even planning to dig out some old paints and find a way to show you lot how I got to ‘m.

Since words are just words, I decided to give some meaning to my words and introduce to you the the first one of the series.

At first I’ll start with a simple sketch. That’s where almost all my paintings start. It’s not a necessity per se, but I like to start with that start of pencil ‘n paper in my hands. Note the small thumbnail I made in the upper left hand corridor. It indicates how I imagine the vehicle would look like from the left. After scanning, I’ll move on to photoshop.

All my paints usually go through four stadia, depending on how complex they are.
For Step #01 I’ll add a simple trace of the lines, it’s the grunt-work of every drawing in my opinion. If you made a finished sketch, this is usually the work you can let your mechanized clone or monkey do (depends on your preference – I went with clones). After this stage, we go into Step #02 where the basic ground colour is added and shadows are applied. Pay strong attention to the light here and always strife for the most realistic feeling when dealing with the objects.
Step #03 is where the fun part begins for me; colouring of the character(s) and all the various objects & details. This is where you’ll love your reference material for just that right touch, when it comes to color and how they act in every environment.
At last there’s Step #04, my absolute favourite one. Here I get to apply the further detailed colouring, the small details & textures that give your paint that extra finishing touch. A few small corrections here ‘n there might occur as well. I usually advise to stand back a bit from your paint at this stage and give it a fresh eye. Mostly, I myself tend to skip this step (not professional – I know, don’t look at me like that!), which usually ends in me going back to step #03 and see where I went wrong.

Vehicle Design

If you made it this far with your own artwork, the only thing left for me is to congratulate you. I hope you had a blast on it and are inspired to get going on the next one. With that in mind, I got a few more paintings waiting for me …

Anyway, I hope that this way, all of you got a better and useful view into my way of working.

Until we meet again,
Me.

People will always need a hero

The Godslayer

The Godslayer

For as long as I can remember, people have been in awe for artists who do their job well. People can stare at your art for hours and spew one superlative after another. I still see this happening once in every two months or so. I too, like any other person, am now guilty on the subject. I just love how people create things I care for. Be it art, books, music or movies. Unfortunately, one cannot simply witness the process of developing movies these days. Same goes for books, or music. You’d literally had to walk into the studio during a movie or barge into the home of a writer whilst he is writing. Art, on the other hand, is an entire different medium. Especially since the uprising of the internet back in the ’90s. Ever since then, people have been blogging about it and posting their work online. Nowadays, it’s the most normal thing. Just log on onto Conceptart.org or CGHUB and you’ll find hundreds of artists strutting their stuff so to speak.

I actually didn’t agree on this. Why, would you ask? Simple. I actually gave you the answer already earlier on. You simply don’t go wandering inside a studio whilst the production of a movie. Or go bothering a band whilst they’re practising their new song. You just don’t. So why is it OK to ask every single step of an artists work? I never understood this really.

Now, that being said, I’ve been told many a times in my life how I should improve my art and how I should do things “their way”. Most of them were ranging from good to really bad, (more the latter then the first at times) but all were given with the best intentions. One of those was to post my work online. Not just the end results mind you, but the in between stuff as well. Again, I don’t fully understand as to the why behind this, other then that it might improve one’s art at an earlier part in the process. I know, I might seem very cocky about this, but to me personally, it feels like an intrusion into my mind. I have no better way of saying it really. For years I’ve always been working in one straight line on my work. Never even thought of it to create wip’s (Work In Progress) at all. There are times though when I knew the sketch/painting was going to rock people’s socks off, but I just didn’t want to brag about it. Because that’s how it feels at times, in my opinion. So I kept doing what I considered the best way of working: Do research on the topic; get it done; present to audience. Simple as that.

Then came along a time, not so long ago really, where I found out that there are actually people who care for this sort of stuff. Who actually ‘want’ to see the boring part in between, just like how you can now see how movies are made by watching the included documentaries. I’ve been looking at my own work like I read books or listen to music. I just didn’t think it was that big of a deal. Like it was normal to any other person out there. Apparently, reality is an entire different thing. I’ll explain it through a simple example, I’ve been using my faithful CTE-640 WACOM for quite some time now. I honestly have to admit that I don’t even remember how I survived before it. I immediately picked up on it the day I got it from a buddy of mine. I still see it as one of the best purchases I’ve ever made so far. So to me, it’s been like the extension of my arm. To others however, it’s like pure magic. I’ve heard things from “… and when he moves his pencil, it moves on the screen too!” to “I still think it looks better on paper.” Honestly, this is coming from normal everyday people. I laughed it away at first. Later I just became baffled, irritated even, at some point. It wasn’t even dawning upon me, until late this summer where I was confronted with this very same happening again.

This time, a lot of people I know and respect well, were like me, gazing upon a giant screen during Gamescom. You could see this artist from Arenanet (I’m not sure at this point if he was from A’net) going through the process of conceiving a new random character. I remember myself thinking, ‘I’ve been doing that so many times now’. So when I actually wanted to move along, the others didn’t. I became intrigued as to why. Call me an idiot and what not, but when you’re in a daily work pattern you just don’t think about it anymore and you just do. So when I was confronted with their explanation on the matter I found out people do care for this sorta stuff. Fast forward to present day.

Today, I’ve just finished a random sketch that took me about two-three whole days to complete. I had a rather funny conversation on twitter with a good friend of mine and it ended with her giving me an idea for a sketch. So when I started, I thought of that same moment in Gamescom again, and decided to do a little experiment this time (sorry hun, for being my little guinea pig ^^). I would make a couple of wip’s and see what her reaction would be. I was actually very pleased with it. She reacted all happy at first, going to completely unexpected, calling it rad at the end. So in summary; as to where I was very sceptical towards it at first, I kind of loved to see her reaction in the end on the matter. Or to quote Hannibal Smith: “I love it when a plan comes together.” Thank you for this hun, you know who you are. (I hope I haven’t offended you by doing so, if you’ll ever read this)

Now, to finish of this wall of text, and because you all expect me to; here’s the work in progress of her drawing: